在Postman 測試之前需要了解的東西
使用 Enviroment 來變更 domain 或 測試資料
{{變數名稱}} 這裡的變數名稱則是Enviroment 或是 global用的變數名稱 postman 會自動幫你帶入
撰寫測試Script
在 postman 的頁面中,你可以看到Tests 點擊進去就可以寫test script了
匯出相關資訊
匯出 postman 的 collection.json 跟 Environmant.json
pm.test()
為了遵循postman的規範,所有測試程式碼必須寫在 pm.test()的function裡面。第一個引數是該測試的名稱,第二個引數是一個返回 boolean值的函式。也就是說這個函式如果返回true,表示測試通過,否則測試失敗。
pm.expect()
這個斷言函式是基於一個JavaScript測試庫ChaiJS BDD構建的。通過類似的語法,你可以很方便的對響應裡的資料或者一些變數進行斷言。
(expect:預期)
pm.response.to.be.*
這個物件可以提供對響應常見的檢查。如狀態碼是否符合預期等。
tv4.validate()
第一個引數是被檢驗的資料,第二個引數是 json schema。通過則返回true,失敗則返回false。如果要快速學習json的schema規範,可以參考https://www.jianshu.com/p/8278eb2458c4?winzoom=1
tv4是postman一個內建的json validator。它基於json-schema draft v4,通過豐富的校驗語法來校驗簡單的 值或者複雜的json物件。
常用api詳情請檢視https://learning.getpostman.com/docs/postman/scripts/postman_sandbox_api_reference
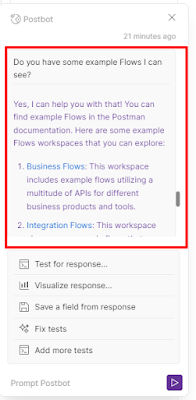
***如果真的想快速產生Test Code程式碼的話可以用Postman的新功能Postbot。怎麼用Postbot請參考我寫的這一篇文章。
使用介面測試

寫完測試CODE,可以發送請求。可以發現Test Results裡面測試結果
使用Runner功能批量執行測試請求
使用命令列進行測試
安裝newman
npm install -g newman
brew install newman
newman執行指令
newman run "collection path" -e "environment path"
例:newman run /Users/hello/Documents/PostmanTesting/Postman_testing.postman_collection.json
-e /Users/hello/Documents/PostmanTesting/Demo100_Records.postman_environment.json
官方說明提供幾種格式cli, json, junit, progress, emojitran,並且在使用 -r 後面帶的格式名稱不可以有空白。預設沒有Html報表......
執行過程可以下-r 的時候附加 cli,就可以看到執行過程。
例:
newman run /Users/hello/Documents/PostmanTesting/Postman_testing_collection.json -r json,cli
下 -e 就可以用環境變數檔
newman run "collection path" -e "environment path"
例:
newman run /Users/hello/Documents/PostmanTesting/Postman_testing_collection.json -e
/Users/hello/Documents/PostmanTesting/Demo100_Records.postman_environment.json -r json,cli
產生html報表需安裝套件
陽春版:npm install -g newman-reporter-html
彩色版:npm install -g newman-reporter-htmlextra
例: (彩色版)
newman run /Users/hello/Documents/PostmanTesting/Postman_testing_collection.json -e /Users/hello/Documents/PostmanTesting/Demo100_Records.postman_environment.json -r htmlextra --reporter-htmlextra-export /Users/hello/Documents/PostmanTesting/TestResult/result.html

API測試
API測試(接口測試)是軟體測試的一種,它包括兩種測試類型:
- 狹義上指的是直接針對應用程式接口的功能進行的測試;
- 廣義上指集成測試中,通過調用 API測試整體的功能完成度、可靠性、安全性與性能等指標。
API測試流程
- 編寫API測試計畫
- 編寫API測試案例
- 執行測試
- 持續整合API自動化測試
API測試概念圖

自動化測試工具架構與流程(AWS)
- 利用Postman GUI編寫API與測試項目
- 匯出測試項目成JSON檔與環境變數檔
- 將匯出測試項目成JSON檔與環境變數檔提交到AWS CodeCommit上去
- 建一個Buildspec檔(buildspec.yml)
- 建一個S3 桶子來儲存測試報表
- 創建一個AWS CodeBuild 專案
- 創建一個AWS CodePipeline在CodeCommit有更新時來驅動CodeBuild
- 最後的結果是在S3的桶子裡有此次的NewmanTesting報表
使用AWS CodeBuild、AWS CodePipeline 和 Postman 自動化您的API 測試
參考此篇文章:
https://aws.amazon.com/tw/blogs/devops/automating-your-api-testing-with-a ws-codebuild-aws-codepipeline-and-postman/
Step 1. Fork the Github repository
Step 2. Clone the forked repository
Step 3. Create an Amazon S3 bucket
Step 4. Edit the buildspec file
- 將 petstore-api-buildspec.yml 中的文本內的 REPLACE_ME_WITH_UNIQUE_BUCKET_NAME 替換為上面第 3 步中創建的存儲桶名稱。
- commit更改到github上
Step 5. Store Postman collection and environment files in S3
導航到 02postman資料夾。對於這個項目,我們包含了一個 Postman 集合文件
PetStoreAPI.postman_collection.json
使用 AWS CLI 將 Postman 集合文件保存在 S3 中
aws s3 cp PetStoreAPI.postman_collection.json \ s3://<REPLACE_ME_WITH_UNIQUE_BUCKET_NAME>/postman-env-files/PetStoreAPI.postman_collection.jso n
使用 AWS CLI 將 Postman 環境文件保存到 S3 中
aws s3 cp PetStoreAPIEnvironment.postman_environment.json \ s3://<REPLACE_ME_WITH_UNIQUE_BUCKET_NAME>/postman-env-files/PetStoreAPIEnvironment.postman_env ironment.json
使用 AWS CLI 將 update-postman-env-file.sh 保存到 S3 中
aws s3 cp update-postman-env-file.sh \
s3://<REPLACE_ME_WITH_UNIQUE_BUCKET_NAME>/postman-env-files/newman/update-postman-env-file.sh
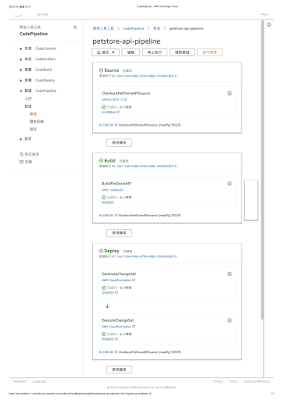
Step 6. Create the PetStore API pipeline
使用 AWS CLI 部署 AWS CloudFormation 模板:
aws cloudformation create-stack --stack-name petstore-api-pipeline \
--template-body file://./petstore-api-pipeline.yaml \
--parameters \
ParameterKey=BucketRoot,ParameterValue=<第3步驟建立的存儲桶名稱(aws-with-postman)> \ ParameterKey=GitHubBranch,ParameterValue=master \ ParameterKey=GitHubRepositoryName,ParameterValue=aws-codepipeline-codebuild-with-postman \ ParameterKey=GitHubToken,ParameterValue=<此處要去github建立要用的token(建立連結)> \ ParameterKey=GitHubUser,ParameterValue=<your github username> \
--capabilities CAPABILITY_NAMED_IAM
此命令創建一個 CodePipeline 管道和所需的階段,以使用 CodeBuild 和 Newman 部署和測試我們的 API。打開 CodePipeline 控制台以觀察您的管道執行並監控不同的階段,
執行結果


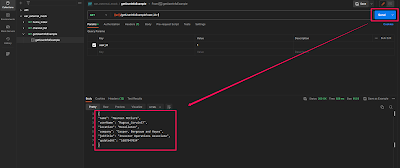


.png)