2014年11月5日 星期三

App Inventor2 利用WebViewer與ActivityStarter連到外部網站

範例:利用WebViewer與ActivityStarter連到外部網站


需求:

建立一個有一文字輸入欄位及兩個按鈕一為『open inside』,『open outside』的頁面。
文字輸入欄位可以輸入url。如果沒有輸入在按下按鈕時就會跳到聯合報首頁。
按下『open inside』會將網頁顯示在app裡面。按下『open outside』則會將網頁顯示在另外開啟的瀏覽器中。

設計師元件佈置作業:
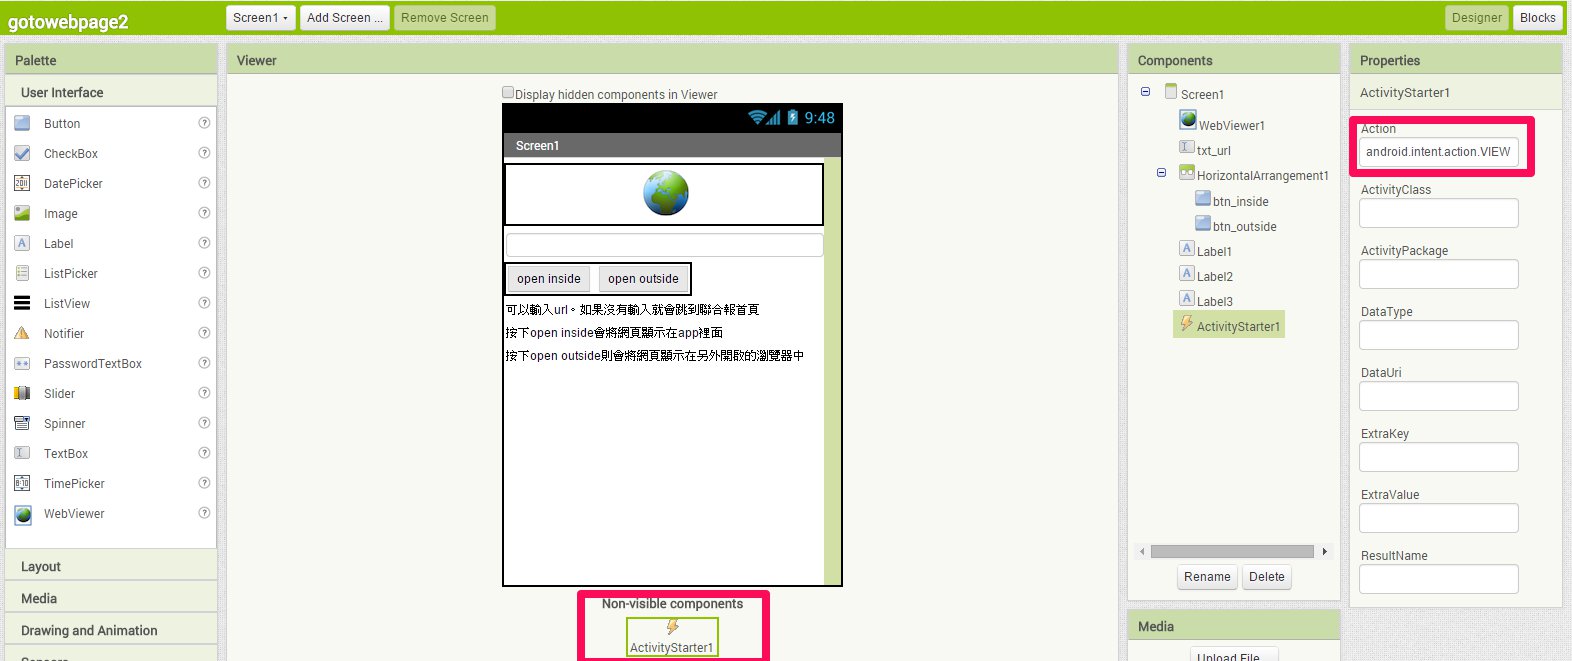
1.在頁面放入 WEBViewer 、TextBox、兩個Button元件及ActivityStarter元件。另外說明部分是用Label元件做的
元件名稱
Properties屬性設定
WebViewer(WebViewer1)
Width:fill parent
TextBox(txt_url)
Width:fill parent
Button(btn_inside)

Button(btn_outside)

ActivityStarter1(ActivityStarter1)
一定要設
Action:android.intent.action.VIEW

示意圖如下:


Blocks拼塊編輯作業:
  1. 進入Blocks拼塊編輯作業裡點選左側Built in Variables的設定一個全域變數(url)。設定其為空值。

  1. 設定按下『btn_inside』時的事件。
    1. 點選左側Screen1->btnRed->When btn_inside.Click do』拖拉到Viewer中。
    2. 設定有沒有輸入網址。點選左側Built in->Control->if then』將此拼塊拖拉到『When btn_inside.Click do』中。並將中間的『=』改成『≠』。
    3. if 的第一個缺口放入『txt.url.Text』(從txt_url物件中選擇的)。第二個缺口則是填入空字串(從Text選擇的)。
    4. then 旁的缺口則是要放入『set global url to 』(從Variables中選到的)。『set global url to 』旁的缺口放入『txt_url.Text』(從txt_url物件中選擇的)。
    5. 加入一個『else』條件。『else』旁的缺口則是要放入『set global url to 』。『set global url to 』旁的缺口放入”http://udn.com”字串(從Text選擇後填寫)。
    6. 點選左側WebViewer1物件選擇『call WebViewer1.GoToUrl』放到剛剛設定的『if then else』下方。
    7. WebViewer1物件 url旁的缺口放入『get global url』(從Variables中選到的)。這樣就完成按下『btn_inside』時的事件。

  1. 設定按下『btn_outside』時的事件。
    1. 點選左側Screen1->btnRed->When btn_outside.Click do』拖拉到Viewer中。
    2. 設定有沒有輸入網址。點選左側Built in->Control->if then』將此拼塊拖拉到『When btn_inside.Click do』中。並將中間的『=』改成『≠』。
    3. if 的第一個缺口放入『txt.url.Text』(從txt_url物件中選擇的)。第二個缺口則是填入空字串(從Text選擇的)。
    4. then 旁的缺口則是要放入『set global url to 』(從Variables中選到的)。『set global url to 』旁的缺口放入『txt_url.Text』(從txt_url物件中選擇的)。
    5. 加入一個『else』條件。『else』旁的缺口則是要放入『set global url to 』。『set global url to 』旁的缺口放入”http://udn.com”字串(從Text選擇後填寫)。
    6. 點選左側ActivityStarter1物件選擇『set ActivityStarter1.DataUrl to』, 放到剛剛設定的『if then else』下方。
    7. 『set ActivityStarter1.DataUrl to』旁的缺口請放入『get global url』(從Variables中選到的)。
    8. 再點選左側ActivityStarter1物件選擇『call ActivityStarter1.StartActivity』,放到『set ActivityStarter1.DataUrl to』下方。這樣就完成了設定按下『btn_outside』時的事件。


示意圖如下

完成了,來看看其中按下『open inside』的畫面吧。畫面如下:
Screenshot_2014-10-29-18-11-34.png

Sample aia 檔案下載網址:http://goo.gl/R45FUS

apk 下載網址:http://goo.gl/EwtPv1

2014年9月17日 星期三

Drupal 7 如何看與編輯未發表的節點內容

要如何查看未發表的節點內容
官網上是這樣說的
In Drupal 7, users are not allowed to view any unpublished content by default, not even content created by themselves. By enabling 'View own unpublished content', you grant users access to their own unpublished content.
The only way to allow users access to all unpublished content in Drupal 7 (without using a contributed module), is to enable the permission 'Bypass content access control'.......

但是打開Bypass content access control'會有安全上的疑慮。

所以建議使用 View unpublished 模組來查看未發表(unpublished)節點內容。
The module View unpublished allows you to grant access for specific user roles to view unpublished nodes of a specific type. Access control is quite granular in this regard. Additionally, using this module does not require any modifications to your existing URL structure.

那要如何編輯未發表的節點內容呢?
照一般的權限編輯的話,編輯未發表的節點內容的下方並不會出現如下圖


這時候得安裝Override Node Options 模組來覆寫某角色對於某個content type之published option 將其打勾即可有權限來編輯此節點的 已發表/未發表


此時在編節點文章時就有勾選已發表/未發表 的選項了。


2014年7月15日 星期二

在Drupal 7用Features匯出匯入content_type

1.安裝features Module後進入  structure -> feature (架構/功能)


2.點選上方『Create Features』標籤,展開『內容類型(content_type)』

3.勾選要匯出的內容類型(勾選後會把內容類型裡面的內容都標記出來)

4.設定左邊匯出之相關資訊
    輸入名稱、描述、Package與版本。其中Packsge建議不要用預設的Feature,需改成其他的與此content_type相關的字眼。版本第一次就用7.x-1囉。然後就可以按下下方的Download feature鍵將剛剛設定的東西匯出來了。


5.匯出來後會是一個由Machine name-版本組成檔名的一個壓縮檔如wheretogo-7.x-1.0.tar檔

6.用這個檔myacticle-7.x-1.0.tar可以到其他台機器上的Drupal用安裝新模組選擇此檔案的方式來匯入Content_type。但是要注意的是匯入的機器要安裝Features這個模組外。並sites/all/modules/features這個路徑要有寫入的權限


8.安裝如果沒有出現錯誤訊息的話,啟動此一新模組就可以再內容類型(Content Type)裡面看到這個內容類型了。


2014年6月25日 星期三

在Drupal Views裡如何用一個條件去篩選n個欄位的值

在Drupal Views裡如果要用一個條件去篩選n個欄位的值要怎麼做勒

步驟如下
1.「FILTER CRITERIA點選『新增』(add)。
2. 在Add filter criteria頁面中使用搜尋欄位搜尋[ global ]。如下圖所示:


3.勾選Global: Combine fields filter選項。並按下方的Apply(all display)。

4.進入Configure filter criterion: Global: Combine fields filter頁面先勾選Expose this filter to visitors, to allow them to change it選項


5.輸入標籤(你想顯示在畫面上的文字)

6.下拉選擇『Operator』運算式。這有很多Operator如 is equal to(等於)、is not equal to(不等於)、Contains(包含)、Start with(起始於)等等......。本例是選擇Contains(包含)。

7.Value不填寫。但在Choose fields to combine for filtering項目中選擇要合併篩選的欄位。可以按著shift鍵來選擇多個項目。(注意:這些選擇的欄位必須是在FIELDS裡面有的欄位。)完成圖如下:


8.按下Apply(this display)鍵將設定結果起來。準備測試~

9.測試結果如果沒有問題的話記得將views儲存起來喔。


2014年6月20日 星期五

Android App 增加擴充檔案的方法

Android App 增加擴充檔案的方法

1.登入Google Play Developer Console 
2.選擇要上傳的應用程式
3.選擇階段並上傳APK檔案
選擇上傳新的APK檔


4.上傳檔案後,會出現這個畫面。下拉使用擴充程式檔,選擇上傳新檔案。然後選擇要上傳的zip檔案(就是把你另外的檔案用zip壓縮起來,就可以了。)
選擇上傳擴充程式檔

5.然後要當成擴充程式檔的zip就會上傳到google play 主機上去了。
上傳擴充程式檔中

6.上傳完畢後就會顯示新的程式擴充檔的檔名。接下來就可以點選下方的『立即發佈...』的按鈕將應用程式發佈出去。
顯示擴充程式檔的系統用之檔名

7.最後就是要等幾個小時,應用程式才會生效。才能在 Google Play Store找到。


2014年3月2日 星期日

Drupal文章內容中增加超連結的CODE


這個例子是將超連結到存放zip檔的位置。
1.在文字格式選擇PHP CODE,且要可以在文字格式選擇PHP CODE要先開啟PHP Filter項目。

2.在編輯欄中輸入底下的CODE:
<?php
//抓目前的node id
$path= $_SERVER ['REQUEST_URI'];
$node_path = explode('/', drupal_get_normal_path($path));
$nodex=$node_path[3];
$nodex1=explode('?', $nodex);
//公用檔案存放路徑
$file_public_path=variable_get('file_public_path', conf_path() . '/files');
//ZIP檔存放路徑
$unzip_file_path=$file_public_path . '/unzipfiles/';
//第二層目錄
$sub_temppath=explode('/',$_SERVER['PHP_SELF']);
$sub_path=$sub_temppath[1]
;//組合第一層目錄+第二層目錄
$url='http://'.$_SERVER['HTTP_HOST'].'/'.$sub_path;
//顯示目前組合之超連結
echo '<a href=\''.$url.'/'. $unzip_file_path.$nodex1[0]. '/index.html\' target=\'_new\' >文件連結</a>';
?>

Drupal增加角色的方法圖示


Drupal 安裝pclzip module的步驟

  1. 先安裝Libraries API  http://drupal.org/project/libraries 
  2. 在Drupal中Enable Libraries Module
  3. 安裝pclzip 模組時要去download兩個東西。一個是pclzip的核心程式 pclzip.lib.php(http://www.phpconcept.net/pclzip/pclzip-downloads)下載最新版本(目前是2.8.2版)
  4.           另外一個是在Drupal用的module(http://drupal.org/project/pclzip)下載(pclzip-7.x-1.x-dev.tar.gz
  5. 在Drupal網站路徑 sites/all/下新建一個libraries資料夾。如果是多網站環境下就是在 sites/all/<domain>/下新建一個libraries資料夾
  6. sites/all/libraries或是sites/all/<domain>/libraries資料夾內再建一個pclzip資料夾並把pclzip.lib.php放到此資料夾中。
  7. 在drupal中安裝pclzip-7.x-1.x-dev.tar.gz這個pclzip模組
  8. 修改pclzip.module file will be there in (pclzip module)
    Go to line# 79 - approx and replace the

    <?phpfunction pclzip_library_exists() {
     
    $pclzip_path = libraries_get_path('pclzip.lib.php');
      if (!
    is_file($pclzip_path)) {
       
    drupal_set_message(t('Could not find the PclZip library file : @pclzip_path', array('@pclzip_path' => $pclzip_path)), 'error');
        return
    FALSE;
      }
      return
    TRUE;
    }
    ?>
    WITH

    <?phpfunction pclzip_library_exists() {
     
    $pclzip_path = libraries_get_path('pclzip');
     
    $pclzip_path = $pclzip_path.'/pclzip.lib.php';
      if (!
    is_file($pclzip_path)) {
       
    drupal_set_message(t('Could not find the PclZip library file : @pclzip_path', array('@pclzip_path' => $pclzip_path)), 'error');
        return
    FALSE;
      }
      return
    TRUE;
    }
    ?>
  9. 在Drupal中Enable pclzip模組
  10. 一定要安裝Libraries API不然會出現miss libaries的錯誤。
補充作法:
Here if some one needs any help, you can use this as patch for now. I think the code that is written for now is wrong.
Do the following steps.
1- Download pclzip.lib.php
2- Create a folder named 'pclzip' inside your libraries folder (preferable - sites/all/libraries)
3- Copy pclzip.lib.php to sites/all/libraries/pclzip (folder) - the path might be diff you have created this folder else where
4- IMP and this is the patch.
Go to pclzip.module file will be there in (pclzip module)
Go to line# 79 - approx and replace the

<?phpfunction pclzip_library_exists() {
 
$pclzip_path = libraries_get_path('pclzip.lib.php');
  if (!
is_file($pclzip_path)) {
   
drupal_set_message(t('Could not find the PclZip library file : @pclzip_path', array('@pclzip_path' => $pclzip_path)), 'error');
    return
FALSE;
  }
  return
TRUE;
}
?>
WITH

<?phpfunction pclzip_library_exists() {
 
$pclzip_path = libraries_get_path('pclzip');
 
$pclzip_path = $pclzip_path.'/pclzip.lib.php';
  if (!
is_file($pclzip_path)) {
   
drupal_set_message(t('Could not find the PclZip library file : @pclzip_path', array('@pclzip_path' => $pclzip_path)), 'error');
    return
FALSE;
  }
  return
TRUE;
}
?>